Thursday, September 2, 2010

Making the most out of your Night and Day DSP download for MDS

So, I finally broke down and bought the Night and Day DSP download for My Digital Studio. I have to say, it took me this long because I thought it wouldn't be worth it - 10 designs, all in black and white. Boy, was I wrong! This may be the most versatile download available. A few simple tricks and you will have twice the designs in ANY Stampin' Up! color!


To double your paper, MDS needs to see the DSP as a photo. To do this, select "Background Papers" in the Design
Center, then choose "Designer Series Paper". Find the Night & Day DSP under Designer Kits and choose "Add as Page Layer".


Workspace after adding DSP as layer
This will give you a small box on your page with part of the paper in it.
To make the layer bigger, double click on the square to bring up the crop window.

Crop Window
If you just drag the square bigger, you won't get more of the paper, just a larger layer of the same square. In the crop window, resize the selection to the desired size. Click okay, and move the layer to the desired location.

Now when you click on the box, the Photos menu is selected in the Design Center. Click on "Photo Effect" box and choose "Negative".
Photo Effects Options


You will see a preview of your paper, select okay to apply it to the paper in your project. That's all there is to it! An easy way to almost double your Night and Day DSP (the polka dots are already doubled and there is not a noticeable difference to the hounds tooth). Here are samples of the papers and their negative:
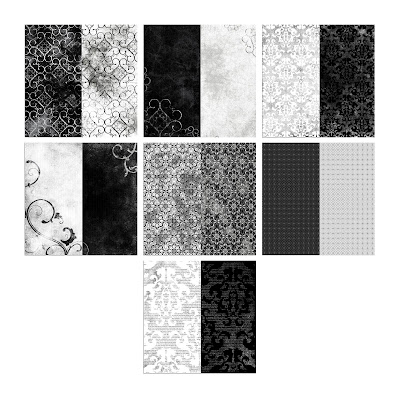


Adding color to the papers is even easier! Add a square punch and resize to match your DSP. Fill with the color of your choice. After coloring the square punch to your choice of color, lower the opacity so you can see the DSP under it. For the sample I used (from top to bottom): Rich Razzleberry, Daffodil Delight, Marina Mist, Concord Crush, Pink Pirouette, and Cherry Cobbler.


Order online today!
118115 Night and Day Designer Series Paper

Wednesday, August 4, 2010

Stamping 411 Saturday Sketch Challenge - 162

I've missed a few of the challenges, but I was able to play today! I love the colors I used in this. I've realized I've been saying that a lot since the color renovation - every time I use a color old or new it becomes my new favorite!

So here's the sketch for this week:


And my creation:


I used Crumb Cake, Night of Navy, and Cherry Cobbler for the colors. I really wish I had a Cherry Cobbler button to go in the middle of the thread, but I haven't ordered them... YET!

One Sheet Wonder


It's almost my mom's birthday so for a gift for her I made a set of cards. One sheet wonders are great for making a set of cards. I found a template on Splitcoast Stampers that makes it easy to create unique cards in no time! For a OSW, start by randomly stamping images on a neutral sheet. I used Whisper White and stamped images from the Cottage Garden stamp set (my new favorite set!) in Daffodil Delight, Tangerine Tango, and Wild Wasabi ink. The template shows you how to make your cuts on the neutral, as well as 3 sheets of colored cardstock. I used Wild Wasabi, Tangerine Tango, and Daffodil Delight. These 3 sheets give you the layers for your cards. I used a sheet of Whisper White, Tangerine Tango, Daffodil Delight, Wild Wasabi, and Garden Green for the card bases. Since this is a gift, I made an assortment of tags to be attached later with the greetings - Birthday Wishes, Thanks so Much, Thinking of You, and Get Well Soon. I also added some butterflies cut from the Beautiful Wings embosslit.

The card I made as her birthday card uses the Sunny Garden designer paper. I LOVE this paper and stamp set! Enjoy!

It's been a while!

It has been a while since I've posted, but that doesn't mean I haven't been busy stamping! There's been a lot going on - camping with the hubby, puppy sick, relatives visiting, puppy sick (AGAIN!), and some stamping.

Here are a few random cards I've worked on. Hope you enjoy them. If you need recipe information, let me know and I'll get right on it!

Wednesday, July 14, 2010

Stamping 411 Saturday Sketch Challenge - 159


This week for the Stamping 411 sketch challenge I used some of my new stuff with some old. The stamp set I was looking forward to most from the new Stampin' Up! catalog was Cottage Garden to match my Cottage Wall DSP. I love this set and this paper!

Paper: Old Olive, Rich Razzleberry, Whisper White CS, Cottage Wall DSP

Ink: Orchid Opulence, Old Olive, Rich Razzleberry

Accessories: Perfect Polka Dots embossing folder, Brights buttons, White grosgrain ribbon

New Stuff!

I finally placed my first order from the new catalog, and it was a big one! It came yesterday and I had so much fun looking at all my new goodies! I will be using it over the next few weeks so keep checking to see my new creations.

I did get to play with it some this morning, and I think I may have made my favorite card EVER! I LOVED the Cottage Wall paper that was in the last catalog and couldn't wait to get my hands on the matching Cottage Garden stamp set from the new catalog. I also ordered the Sunny Garden paper, which is the same design as Cottage Wall only in new colors. Before cutting into that, I wanted to use some of the retired Cottage Wall paper. I started out planning on using the Stamping 411 sketch challenge 159, but couldn't bear the thought of covering up so much of my beloved paper, my card took a completely different direction!

Paper: Rich Razzleberry and Orchid Opulence Card Stock, Cottage Wall DSP

Stamps: Cottage Garden

Accessories: Rich Razzleberry Grosgrain Ribbon, Beautiful Wings Embosslit, Eyelet border punch

A little behind....

Last week I completed a few projects but never posted any pictures, so here are a few just to show what I've been up to...

The first is a necklace I made using a domino. I think it turned out quite nice, although my husband thinks the domino is too big for a necklace, so I may try heading to Home Depot to get some small tiles to try instead of the domino.


Next is a card I made just because. I love the color combination. I think Daffodil Delight may be one of my favorite new colors! It is such a happy color, I just love using it! Hope you enjoy!
Domino Stamps & Colors:
Pretty in Pink Refill
Early Espresso Classic Pad
Eastern Blooms Stamp Set
Card Stamps & Colors:
Melon Mambo Card Stock
Soft Suede Card Stock
Daffodil Delight Card Stock
Dreams du Jour Stamp Set
Soft Suede Classic Ink Pad
Daffodil Delight Classic Ink Pad

Wednesday, July 7, 2010

Stamping 411 Saturday Sketch Challenge

I love challenges! (When it comes to stamping, that is) They are fun to do, fun to check out others creations, and give me a direction to head. (Although sometimes I start out with a challenge in mind and wind up somewhere completely different!) Challenges can be the use of a certain color combo, a sample layout, a technique, you get the idea. Here is this week's sketch challenge from Stamping 411:


I needed to make an anniversary card for my parents (Happy Anniversary, Mom & Dad!) and I thought this sketch would be perfect. I've been wanting to use some of my new ribbon and colors from the new Stampin' Up! catalog and thought this was a perfect opportunity. I used the new hostess set, Fast & Fabulous, and was it ever! The inks I used are Daffodil Delight and Old Olive. I used Old Olive for the base of the card. The after stamping the flower with DD, I stamped off and gave some shadow-y flowers for the background. I used OO as the second color for my 2-step. I wanted to add some color to the background of my stamped image so I got out my markers and color spritzer. Since I don't have my new color markers yet, I used So Saffron to make the yellow spritz. The ribbon is the new 1/8" Black Taffeta ribbon. All in all, I am very happy with the way it turned out. (The ribbon got a little smooshed when I scanned it in!)

Wednesday, June 30, 2010

New cards from MDS

I've made a few cards using My Digital Studio. I love that program! You can quickly make a card using the premade designs, tweak the design to make it your own, or just start from scratch and design your own card. I designed my own for these two.

For the "True Friend" card, I added a drop shadow to the stamps. Since you don't have a shadow when you are stamping with ink and rubber, I moved the shadow directly under the image by using the arrow keys to shift it to the pixel offset of X:0, Y:0. I reduced the blur to 3 and increased the opacity to 75%. All of these options are available under the "Drop Shadow" window that comes up after you select drop shadow. I also changed the color to be the same as the "ink". This gave my flowers a heat embossed look. I will be posting more details on how to achieve this effect.

The second card is fairly simple and straight forward. Let me know if you have any questions!

Wednesday, June 23, 2010

Stampin' Up! "Because I Care"


It's been a while since I have posted, the new puppy does not allow for much time stamping!

Today I was able to get some time to work on a card. I used one of the hostess sets from the NEW catalog set to debut July 1st. I am very excited about the new catalog - not only new stamps and accessories this year, but new colors! I have a few of them and I am so excited to use them. Well, back to my card.

This card uses a few techniques, first I used blurred water coloring for the flower. To do this, ink up your stamp using dye ink. For this card I used Pacific Point, one of Stampin' Up!'s returning In Colors. I didn't really want a blue stem and leaves so I used my Always Artichoke marker to color over the blue ink after inking my stamp. I stamped the image onto Whisper White card stock. Using an aqua painter, available from SU, I colored over the stamped image to spread the color out. When finished, I trimmed my paper down to the size I wanted. After, I layered that onto a piece of Melon Mambo card stock (a current In Color that will become one of the "core" colors July 1). I decided I like the look of setting it diagonal along the layer. Using the scallop trim punch, I created the Pacific Point bottom layer. I took white grosgrain ribbon across the bottom of the Pacific Point card stock and created a "faux bow". The bow was so easy to make, and added a bit of fun to the card. It may be difficult to see on the image, but I used the single flower image on the Pumpkin Pie base using Versamark ink. I then attached the Pacific Point layer to the Pumpkin Pie base, stamped "thank you" along the bottom in Pacific Point, and voila, my card was finished!

I am really happy with how this card turned out. It wasn't quite how I planned it out, but as I was working, ideas just popped into my head. The card really created itself. I used a few new (to me) techniques and elements in this card, as well as some old ones. The border punch is a new one for me, and not one I would have thought to use a few months ago. I am really glad I added this punch to my supplies! I love the look it gives to my layers. There are a few other border punches in the new catalog, and I plan on adding a few to my collection.

The faux bow is another technique that I tried for the first time on this card. Again, I love how it turned out! I took my longer piece of ribbon, attached it to the layer and at first was going to leave it at that. Then I remembered the faux bow technique. To make this bow, you just need a few more pieces of ribbon and some SNAIL adhesive. I made a circle with a piece of ribbon about 2.5 inches long by putting some SNAIL on one end of the ribbon and looping the other end around. I then took a smaller (about 1 in.) ribbon and put some SNAIL on that, as well as the seam of the the larger loop. Then I wrapped the smaller ribbon around the larger one, pinching it in the middle. I used some SNAIL along the back of the bow and placed over the the ribbon already on the Pacific Point!

I hope you like the card!

Thursday, June 10, 2010

Hoh Rainforest Scrapbook Pages


Using Stampin' Up!'s My Digital Studio has taken scrapbooking to a new level! Everything needed to get started is included in the program! Stampin' Up!'s exclusive colors are included, for backgrounds, designer papers, and stamps. I used the program to create a 2 page layout from my recent trip to the Hoh Rainforest. One of the things I love most about the program is how easy it is to use! For this project, I created my own layout using a map found at page-maps.com. If you are in a hurry you can always use one of the predesigned layouts. If you already use another scrapbooking program (gasp!) you can still purchase and use the SU digital downloads. There are many to choose from now, and more being added monthly. Check back often to see what is new in SU's world of digital scrapbooking!

Hoh Rainforest


Yesterday I headed to the Hoh Rainforest in Olympic National Park with some friends. It was absolutely incredible! We did a short hike, only about 3/4 of a mile through the temperate rainforest and saw some beautiful sights! I took lots of pictures that I will be working on a scrapbook page later today.

The trees there were incredible - there was one that had fallen and was over 190ft tall, quite possibly the biggest trees I have ever seen. Walking along side the tree I realized it was almost as wide as I was tall. Standing next to it, the tree was up to my shoulder. One of the coolest things about it was the way it had conformed itself to the terrain. The trunk of the tree was at the top of an incline and the tree eventually molded itself down the slope.

It was a wonderful experience. I am looking forward to going again and seeing more, but for now, I will have to get scrapping!

Monday, June 7, 2010

Birthday Wishes


This is a card I made using the Black Magic Technique. Stamp your image on dark cardstock using white craft ink, heat set with embossing tool, then color with colored pencils. Outline with white gel pen.
Project Recipe:
Stamp Sets: SU Watercolor Trio from Summer Mini Catalog
Paper: SU Ruby Red, Pixie Pink, and Basic Black CS, SU Bermuda Bay Script DSP
Ink: SU White Craft ink

Welcome Back! (to me!)

Wow! Things have changed in the world of Stampin' Up! I was a demo several years ago and unfortunately had to stop. Over the past few years, I did not have much time to devote to stamping and scrapbooking (I was working on my master's degree). I recently moved and started stamping again. When I saw Stampin' Up! was offering a "mini" starter kit this month, I had to jump on it! I am amazed at all the changes that have happened while I was away. The demonstrator website, where customers can place their orders online 24 hours a day, 7 days a week is FANTASTIC! I think my favorite addition is Stampin' Up!'s My Digital Studio. Keep on the lookout for projects I make with the program, as well as tutorials as I learn the ins and outs of it!

Enjoy!

Background


Disclaimer

This is my personal blog. While I am a Stampin’ Up! Demonstrator, Stampin’ Up! does not endorse any non-Stampin’ Up! products I may offer here, nor do they endorse the content of classes or services I provide. This blog is my sole responsibility. Any images here may not be used for your own contests or profit without my permission.