Tuesday, August 6, 2013

Housewarming Card

A few weeks ago, this was the sketch from Create with Connie & Mary. 
My niece bought a house not too long ago and I finally finished their housewarming present (photo coming soon!) and made a card for them using this sketch. 
Stamps: Crazy, Mixed-Up Love
Colors: Pistachio Pudding, Strawberry Slush, Crisp Cantaloupe,  Bermuda Bay
Accessories: Strawberry Slush Core'dinations, Modern Mosaic Embossing Folder, Crisp Cantaloupe, Ruffled Stretch Ribbon, Stampin' Write Markers, Sanding Block

Wednesday, February 9, 2011

New Downloads for My Digital Studio - Word Play Stamp Brush Set

Tuesday has become my favorite day of the week! On Tuesdays new digital downloads are available from Stampin' Up! It is almost as exciting as Christmas, and close to the excitement of the new catalog logging on to see if Stampin' Up! has new downloads available and what they are. This week had several new downloads, including the Word Play stamp brush set. I was excited about this download because the actual stamp set has been on my wishlist for a while now (those darn mini's keep having sets that jump the line ;)), but when I actually downloaded it and started playing with it I was even more excited! Each "stamp" is actually 3! One is the entire image and the other two get layered together so you can use more than one color! Here's a sample of all the stamps that are available:After playing with it for a little while, I have a few tips to make it easier to add to your projects. I found it easier to line up & resize if you first add the whole image to your project.


Next, resize and place your image.
After adding, resizing, and placing your whole image, add one of the layers and recolor. (I chose the same color as my background so part of it does not show up in the picture)
Move the first layer to the top of the whole stamp and using the whole stamp as a guide resize and move so they line up. (A little sliver of the bottom seems to poke out no matter how close the placement seems to be, but that's okay because you will eventually delete the whole stamp)
Repeat the last step with the second layer. (Add, recolor, resize, and move into place)
After resizing the image, select and move it back so the whole image is on top. Then select the whole image and delete it. If you delete the wrong image, just click undo and try again. It sometimes helps to click off the image so nothing is selected and try selecting again.
I was so excited to see the stamps in parts so they could be colored differently. If you have any questions, let me know and I will do my best to answer them. Enjoy the new downloads!


Saturday, January 29, 2011

Why I love My Digital Studio


I wanted to write a post with all the reasons I love My Digital Studio. I started out typing it all out, but then decided a page from My Digital Studio would show you show much more!

Friday, January 28, 2011

Sale-A-Bration

Hooray for Sale-A-Bration! Now through March 31, 2011 you can earn FREE stamps for every $50 you order! There are special Sale-A-Bration stamp sets available only during this time and only for free! This year one of the options is a digital content CD for My Digital Studio. On the disk is a brush set of EVERY Sale-A-Bration set, the special Ice Cream Parlor DSP and Accents Kit, plus the Ice Cream Parlor ribbon and buttons. Here is what you get on the disk:
Description Image Contents
Punch Bunch Stamp Brush Set Five-piece stamp brush set.
Notes Stamp Brush Set Three-piece stamp brush set.
Bliss Stamp Brush Set Five-piece stamp brush set.
So Happy For You Stamp Brush Set Ten-piece stamp brush set.
Sweet Summer Stamp Brush Set Nine-piece stamp brush set.
Ice Cream Parlor Ribbon & Button Kit Three digital ribbons, three digital buttons.
Ice Cream Parlor Designer Series Paper & Accents Kit Six Designer Series Paper Patterns, nine borders, 20 elements, and 27 flowers.
I received my Sale-A-Bration order yesterday and used the Ice Cream Parlor DSP and accents to create a new background for my blog. You can go to the online store at Stampin' Up! to place your order (be sure to choose a demonstrator to get the best pricing!) or email me today to place your order! The best part - if you order all digital content online you don't pay shipping and you can still qualify for the free merchandise!

Thursday, September 2, 2010

Making the most out of your Night and Day DSP download for MDS

So, I finally broke down and bought the Night and Day DSP download for My Digital Studio. I have to say, it took me this long because I thought it wouldn't be worth it - 10 designs, all in black and white. Boy, was I wrong! This may be the most versatile download available. A few simple tricks and you will have twice the designs in ANY Stampin' Up! color!


To double your paper, MDS needs to see the DSP as a photo. To do this, select "Background Papers" in the Design
Center, then choose "Designer Series Paper". Find the Night & Day DSP under Designer Kits and choose "Add as Page Layer".


Workspace after adding DSP as layer
This will give you a small box on your page with part of the paper in it.
To make the layer bigger, double click on the square to bring up the crop window.

Crop Window
If you just drag the square bigger, you won't get more of the paper, just a larger layer of the same square. In the crop window, resize the selection to the desired size. Click okay, and move the layer to the desired location.

Now when you click on the box, the Photos menu is selected in the Design Center. Click on "Photo Effect" box and choose "Negative".
Photo Effects Options


You will see a preview of your paper, select okay to apply it to the paper in your project. That's all there is to it! An easy way to almost double your Night and Day DSP (the polka dots are already doubled and there is not a noticeable difference to the hounds tooth). Here are samples of the papers and their negative:


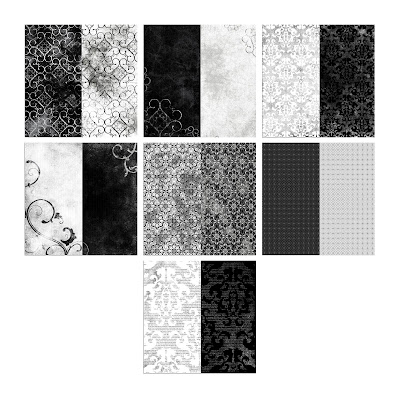
Adding color to the papers is even easier! Add a square punch and resize to match your DSP. Fill with the color of your choice. After coloring the square punch to your choice of color, lower the opacity so you can see the DSP under it. For the sample I used (from top to bottom): Rich Razzleberry, Daffodil Delight, Marina Mist, Concord Crush, Pink Pirouette, and Cherry Cobbler.


Order online today!
118115 Night and Day Designer Series Paper

Wednesday, August 4, 2010

Stamping 411 Saturday Sketch Challenge - 162

I've missed a few of the challenges, but I was able to play today! I love the colors I used in this. I've realized I've been saying that a lot since the color renovation - every time I use a color old or new it becomes my new favorite!

So here's the sketch for this week:


And my creation:


I used Crumb Cake, Night of Navy, and Cherry Cobbler for the colors. I really wish I had a Cherry Cobbler button to go in the middle of the thread, but I haven't ordered them... YET!

One Sheet Wonder


It's almost my mom's birthday so for a gift for her I made a set of cards. One sheet wonders are great for making a set of cards. I found a template on Splitcoast Stampers that makes it easy to create unique cards in no time! For a OSW, start by randomly stamping images on a neutral sheet. I used Whisper White and stamped images from the Cottage Garden stamp set (my new favorite set!) in Daffodil Delight, Tangerine Tango, and Wild Wasabi ink. The template shows you how to make your cuts on the neutral, as well as 3 sheets of colored cardstock. I used Wild Wasabi, Tangerine Tango, and Daffodil Delight. These 3 sheets give you the layers for your cards. I used a sheet of Whisper White, Tangerine Tango, Daffodil Delight, Wild Wasabi, and Garden Green for the card bases. Since this is a gift, I made an assortment of tags to be attached later with the greetings - Birthday Wishes, Thanks so Much, Thinking of You, and Get Well Soon. I also added some butterflies cut from the Beautiful Wings embosslit.

The card I made as her birthday card uses the Sunny Garden designer paper. I LOVE this paper and stamp set! Enjoy!

Disclaimer

This is my personal blog. While I am a Stampin’ Up! Demonstrator, Stampin’ Up! does not endorse any non-Stampin’ Up! products I may offer here, nor do they endorse the content of classes or services I provide. This blog is my sole responsibility. Any images here may not be used for your own contests or profit without my permission.